FOMEI Stropní systémová sada - uživatelský průvodce PhotoRobot
Tento uživatelský manuál popisuje hlavní komponenty a postupy instalace systému stropních svítidel FOMEI na kolejnici. Cílem této informace je podpořit zákazníky PhotoRobot při instalaci stropního systému pro montáž profesionálních studiových blesků a světel pro PhotoRobot. Obsahuje přehled všech hlavních komponent a montážní kroky pro FOMEI Ceiling System Kit 1 (3 x 3m), Kit 2 (3 x 5m) a Kit 3 (5 x 5m).
Poznámka: Tento průvodce sestavováním je reprodukcí oficiální dokumentace FOMEI. PhotoRobot a FOMEI jsou dlouholetí partneři, kteří zajišťují vynikající osvětlení produktů pro automatizované fotografické systémy PhotoRobot. Pro oficiální stahovatelnou PDF verzi od výrobce navštivte web FOMEI Lights & Photography.
Důležité: Před uvedením do provozu se ujistěte, že produkt je neporušený a že nechybí žádné díly. Pokud je nějaká vada, kontaktujte prosím přímo FOMEI. Pro informace o záruce a údržbě produktů FOMEI se podívejte na dokumentaci poskytnutou speciálně pro vaše zařízení.
PhotoRobot - Nastavení stropního systému FOMEI
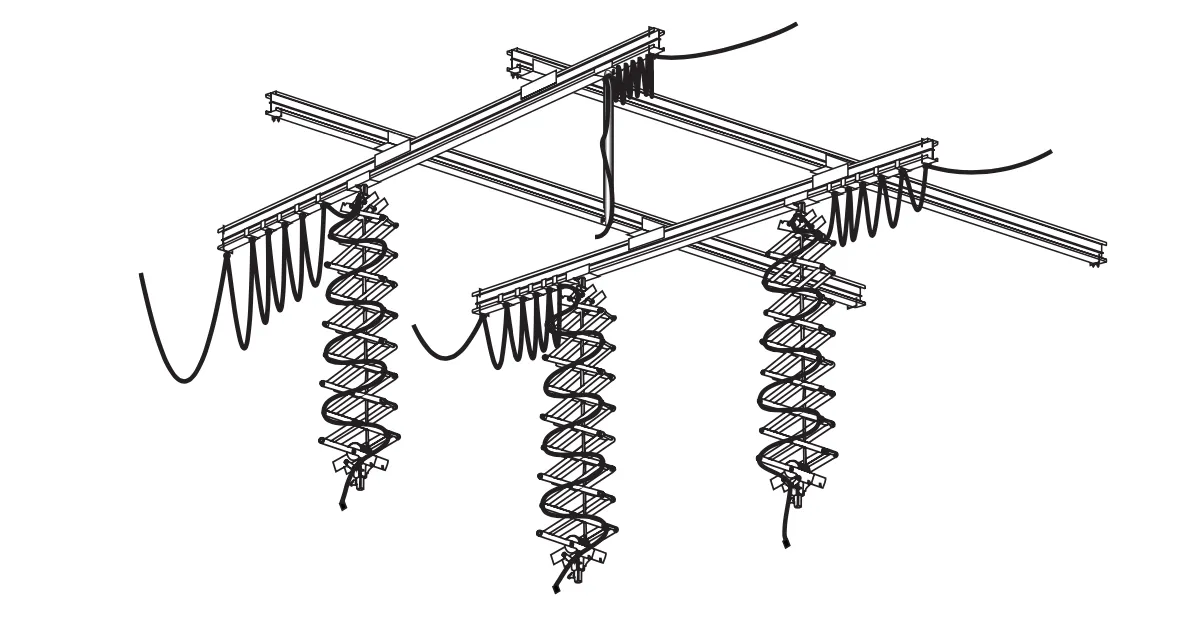
Stropní svítidla FOMEI je profesionální systém kolejí, vozíků, sběračů a dalších komponent, který usnadňuje práci ve fotostudiu nebo filmu. Systém se skládá ze tří sad různých velikostí, které zahrnují následující díly a postupy instalace.
Poznámka: Je také možné stropní systém doplnit dalšími komponentami podle potřeby.
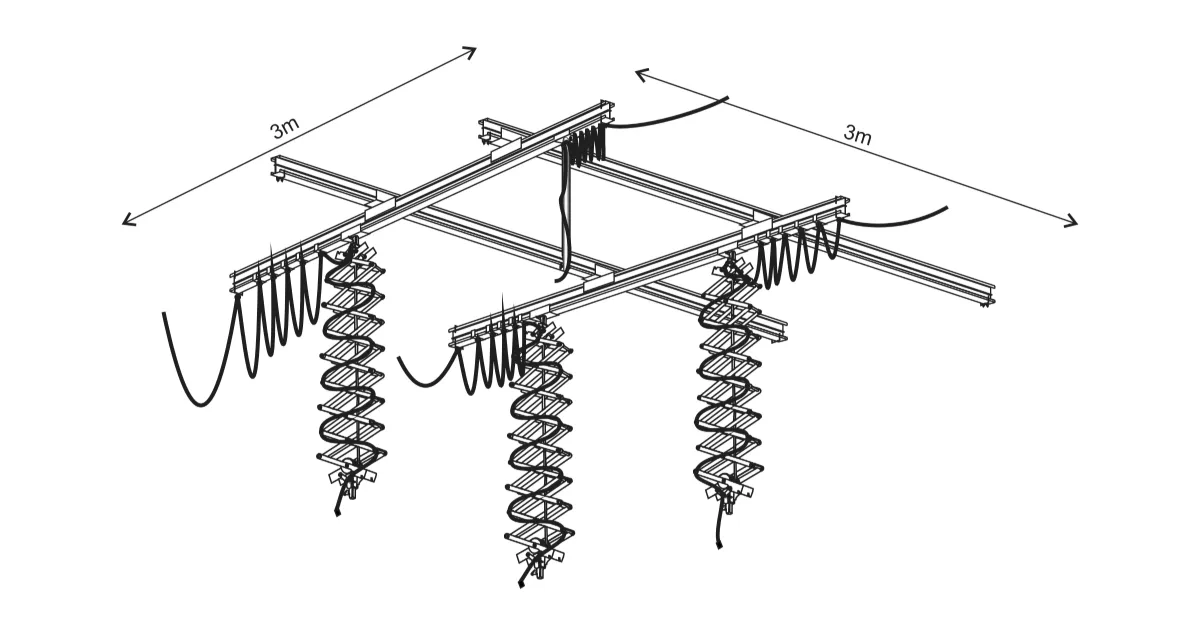
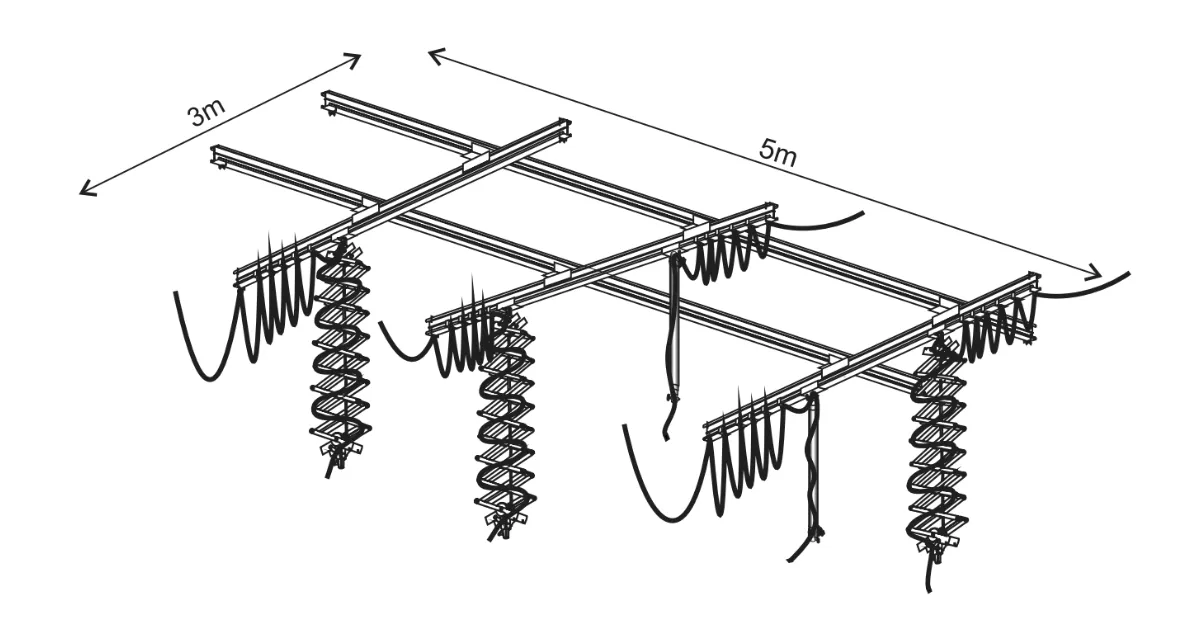
Stropní systém: Sada 1 (3 x 3m)
Stropní světelný systém FOMEI Kit 1 má rozměry 3 x 3 metry a vyžaduje následující komponenty a postupy instalace.
- 4 x kolej 3m
- 6 x kolejové stropní svítidlo
- 4 x dvojitý tramvaj
- 3 x pantograf
- 1 x teleskopická tyč
- 4 x jednorázový tramvaj
- 12 x vozík s upevněním kabelu
- 55 x fixace pantografu
- 8 x konec kolejí
- 4x redukce se šroubem
- 4 x bezpečnostní kabel
- 4 x kabel 10m
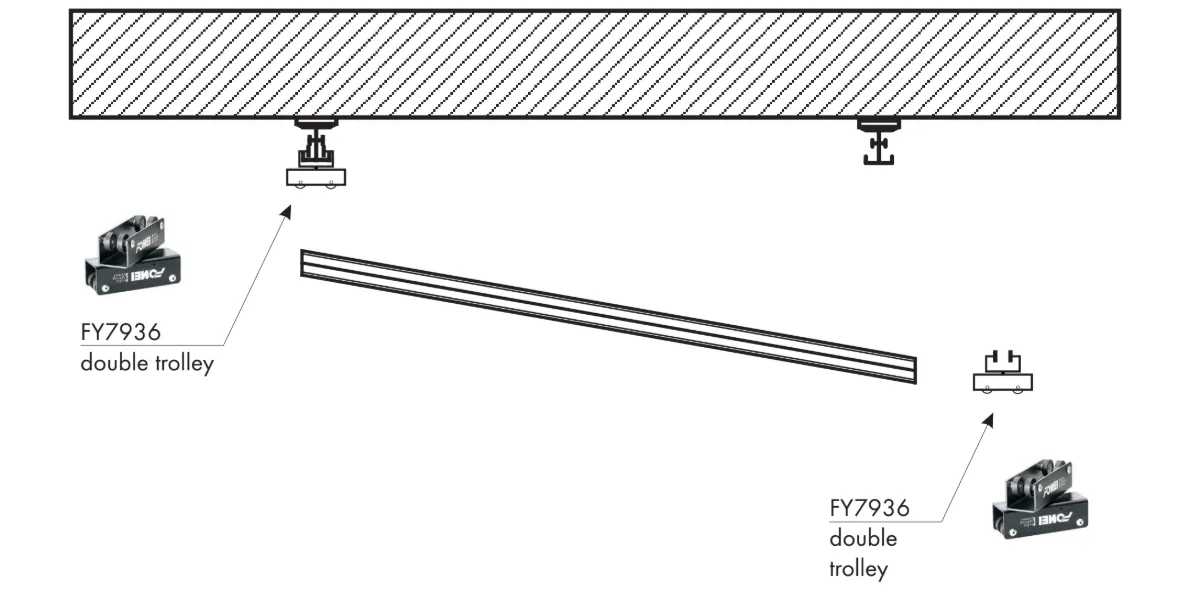
- FY7936 - dvojitá tramvaj
- FY7935 - jednokolejová tramvaj
- FY7951 - oprava kabelu na kolej
- FY7931 - kolej 3 m
- FY7938 - montáž kolejí až ke stropu
- FY7939 - kabelové svítidlo k pantografu
- FY7942 - redukce
- FY7943 - bezpečnostní kabel
- FY7945 - AC vstupní kabel 10m
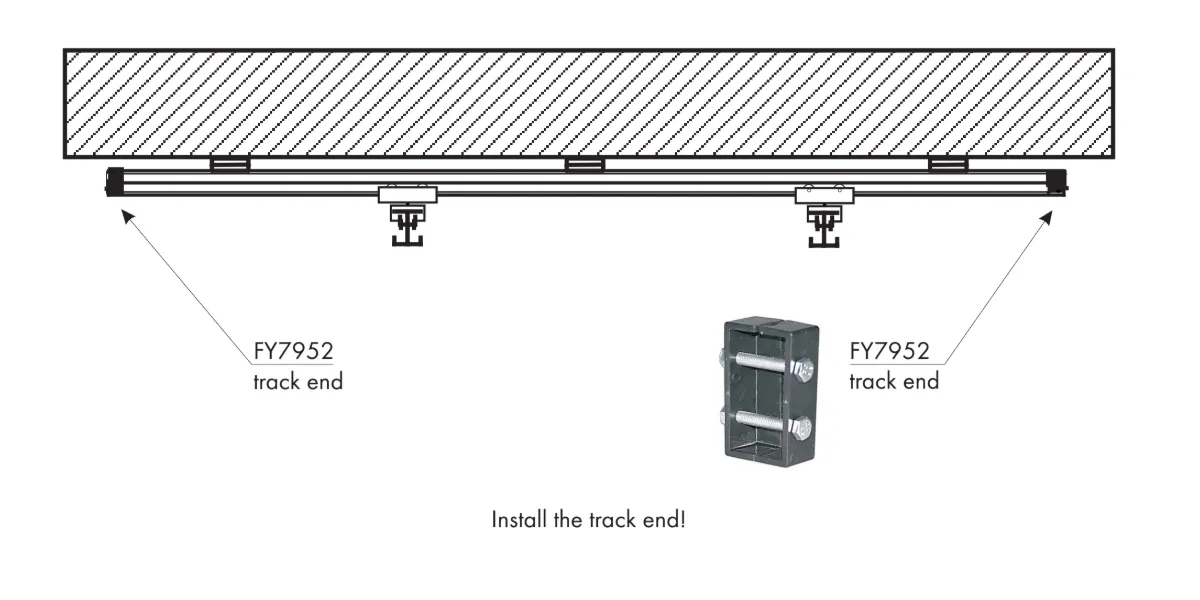
- FY7952 - konec koleje
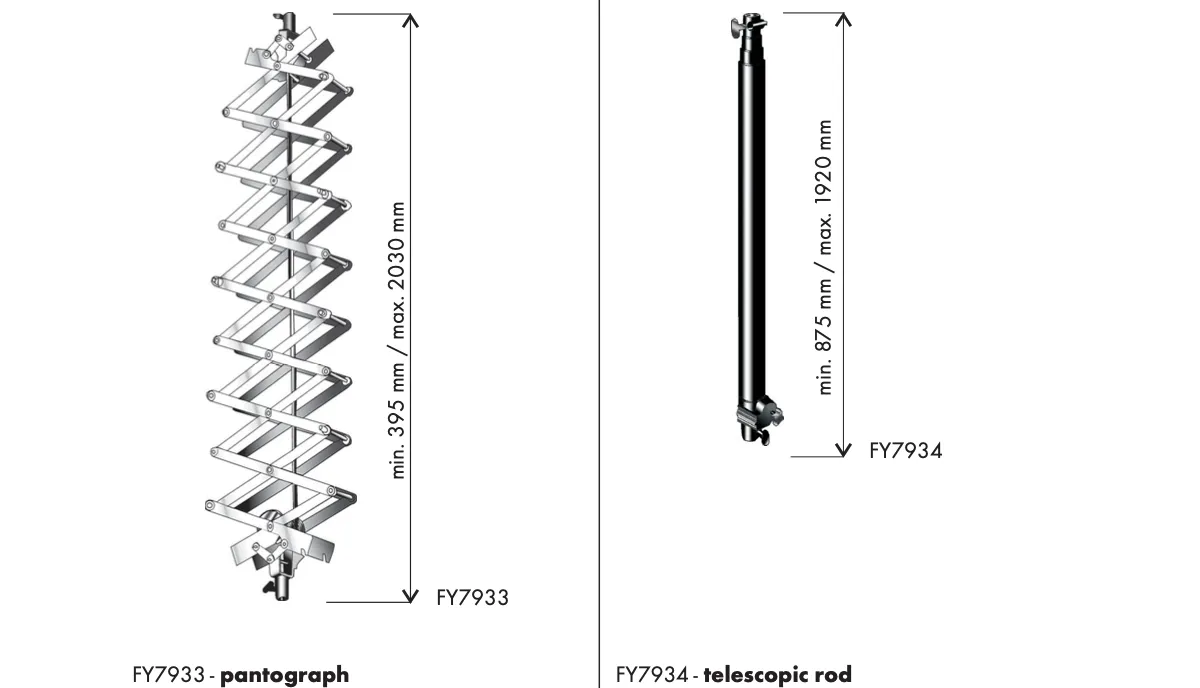
- FY7933 - pantograf
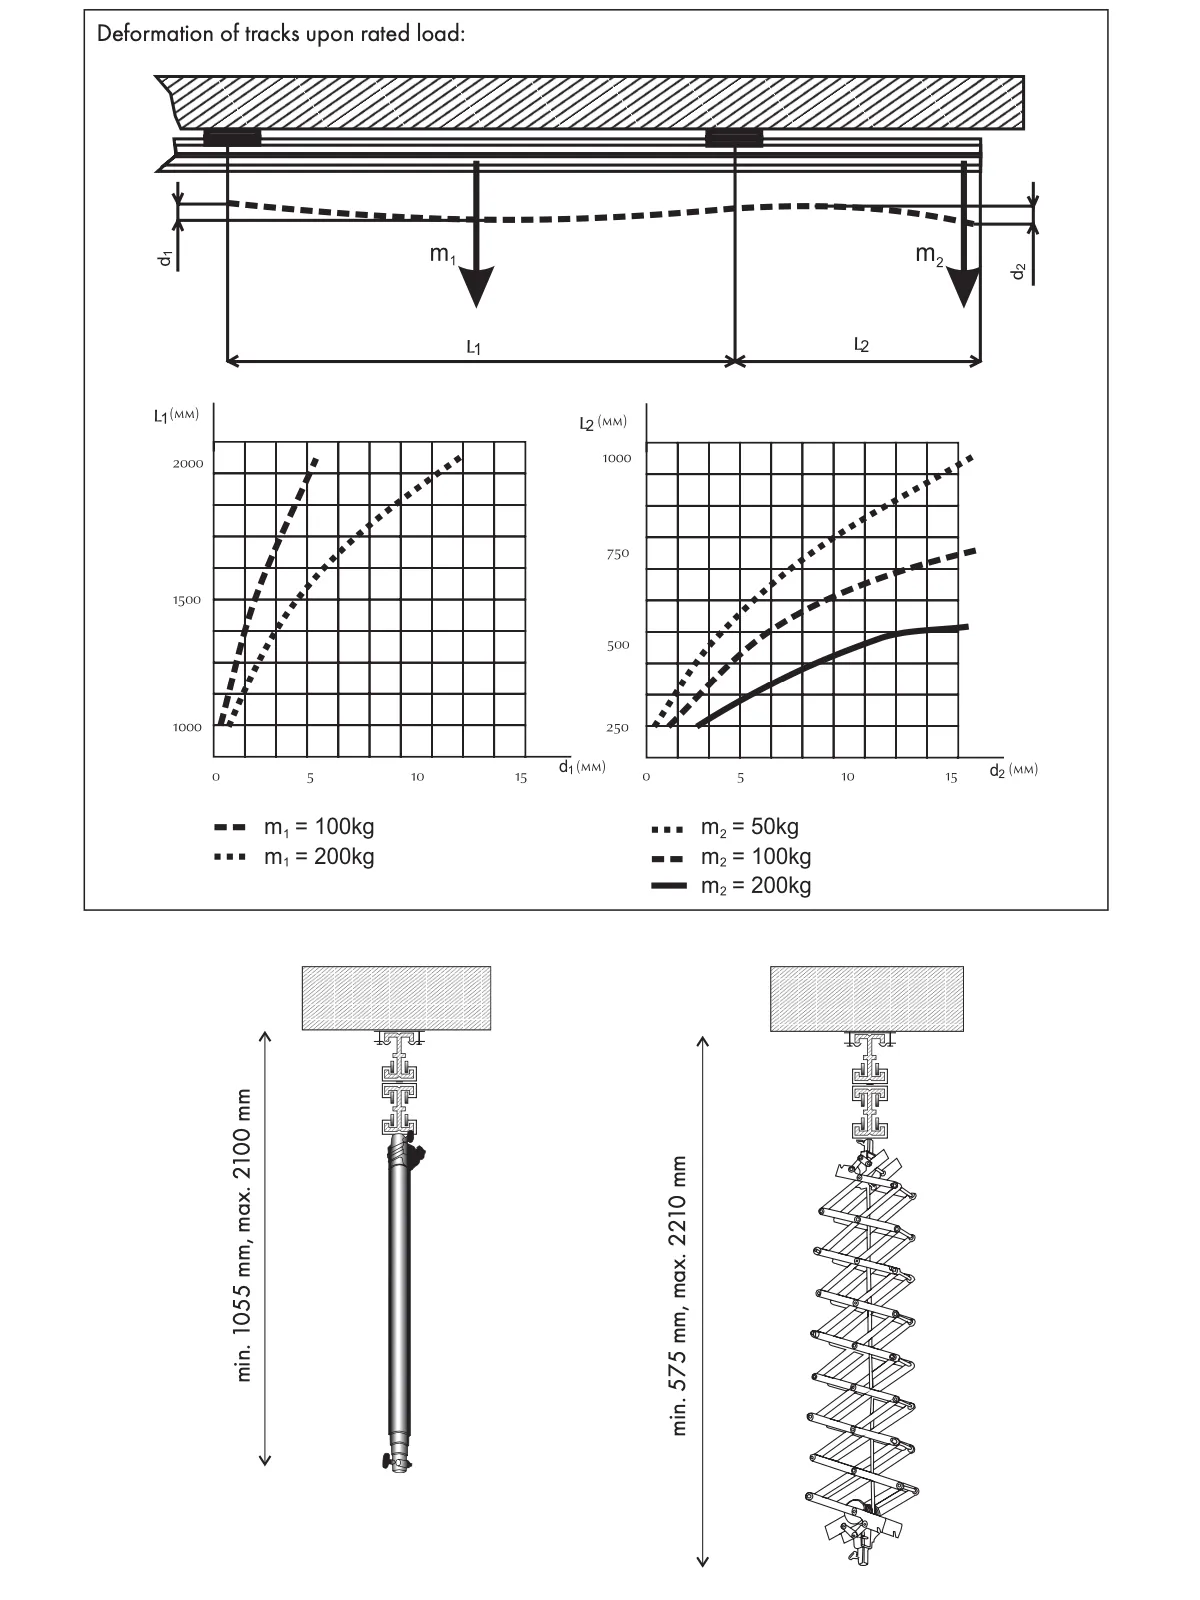
- příčník od 395mm do 2030mm
- maximální zatížení 1-15kg
- možnost regulace zablokování smyku
- bezpečnostní pojistka
- FY7934 - teleskopická tyč
- 3 sekce
- příčník od 875mm do 1920mm
- pružina pro zjednodušenou manipulaci
- bezpečnostní pojistka
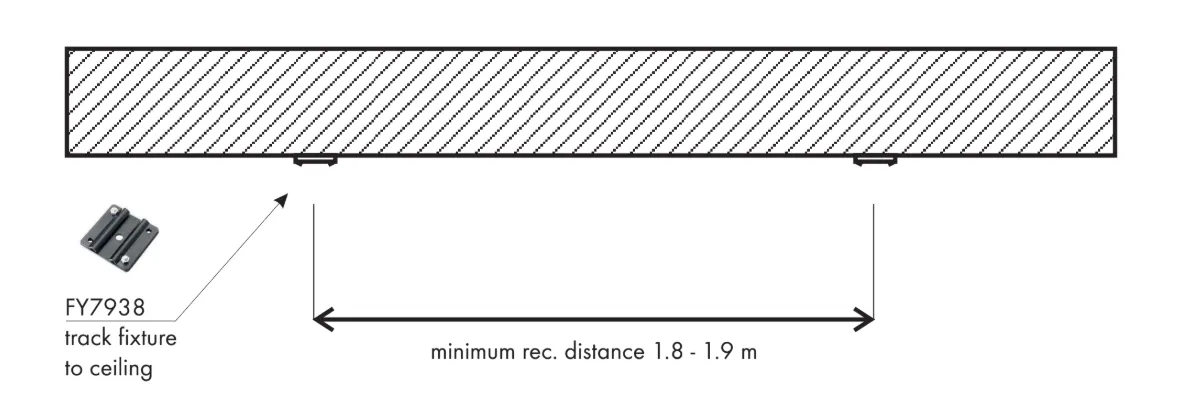
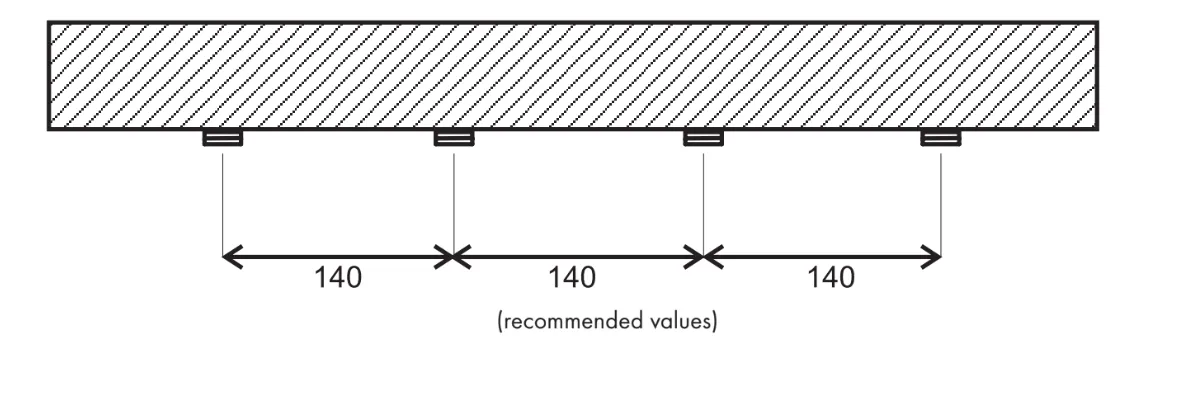
- Hlavní ložiskové pásy by měly být od sebe vzdáleny alespoň 180 cm. Tím zajistíte správnou funkčnost pohyblivých kol.
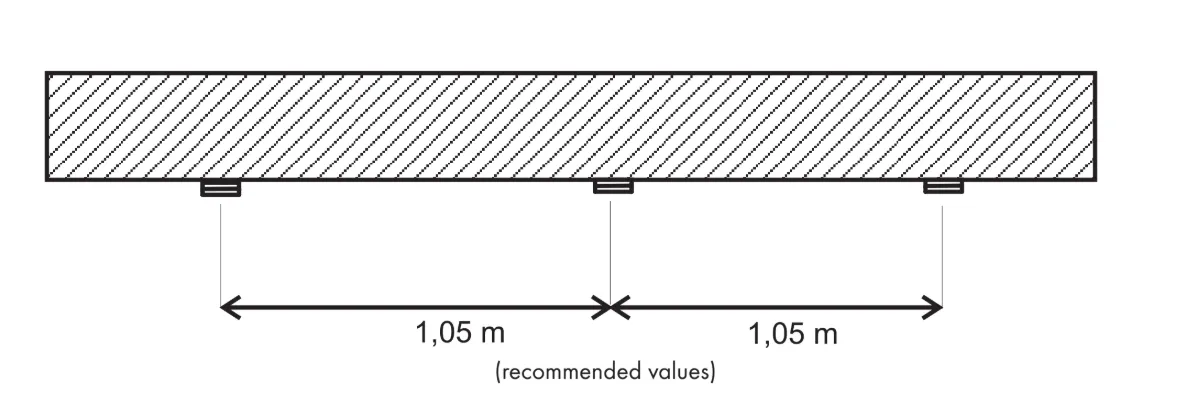
- Všimněte si, že vzhledem k minimálnímu valivému odporu je nutné vyvážit hlavní pásy.
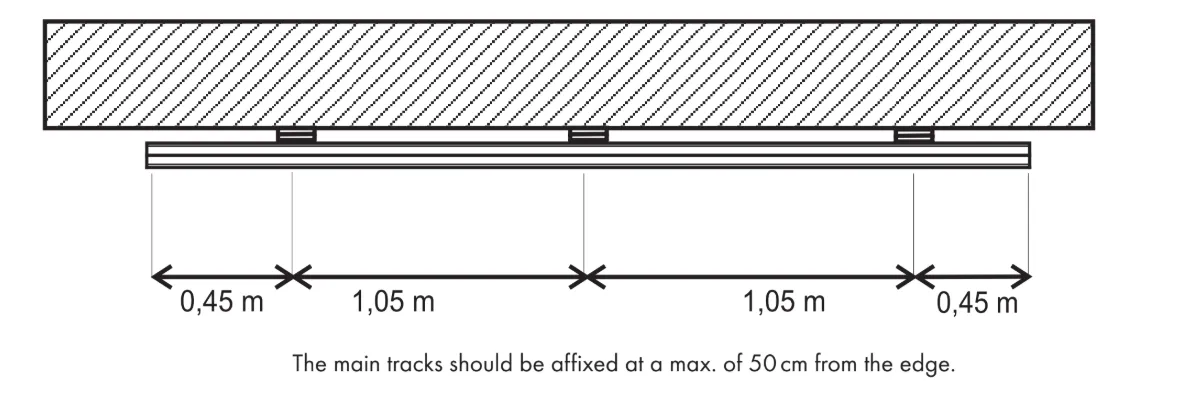
- Ujistěte se, že hlavní koleje jsou připevněny maximálně 50 cm od okraje.
Nejvhodnější a ověřený postup instalace kolejí je následující.
- Nainstalujte dvojité vozíky, otočené přibližně o 80 stupňů, na jednu z kolejí připevněných ke stropu.
- Nainstalujte dvojitý vozík na pohyblivou kolej.
- Posuňte pohyblivou kolejnici do dvojité tramvaje, která je instalována na připevněné kolejnici.
- Nainstalujte pohyblivou kolejnici s vozíkem do připevněné kolejnice.
- Nyní jsou dvojité tramvaje instalovány na připevněných kolejích a pohyblivá kolej je instalována do dvojitých tramvají.
- Pokračujte stejně tak v dalších skladbách.
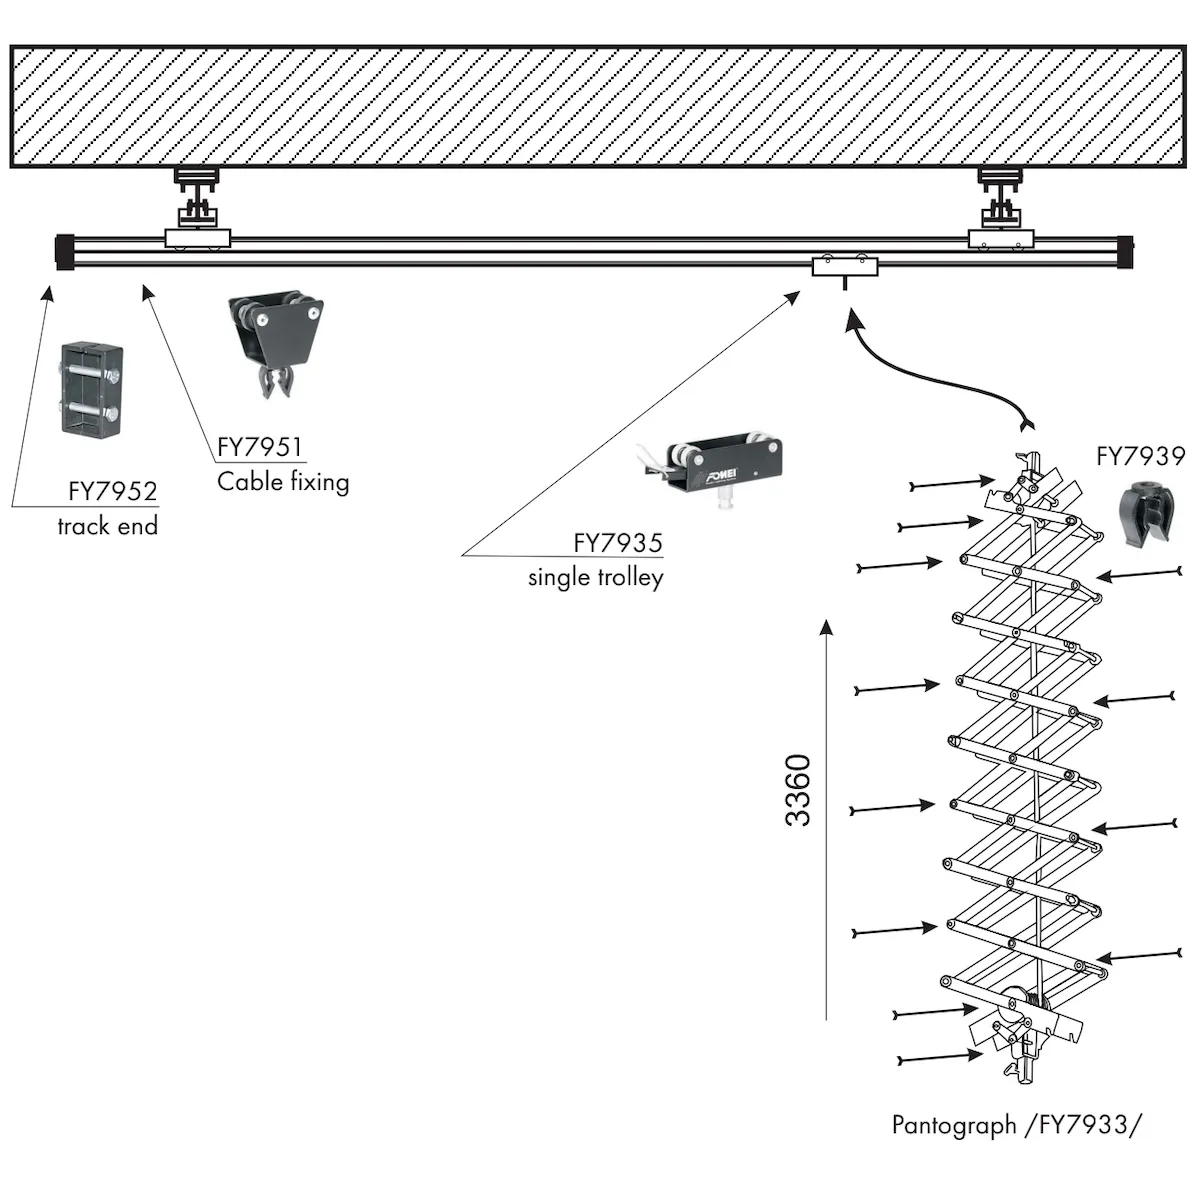
- Nainstalujte jednotlivé vozíky /FY7935/ do koleje.
- Nainstalujte vozíky s kabelovým upevněním na kolejích /FY7951/.
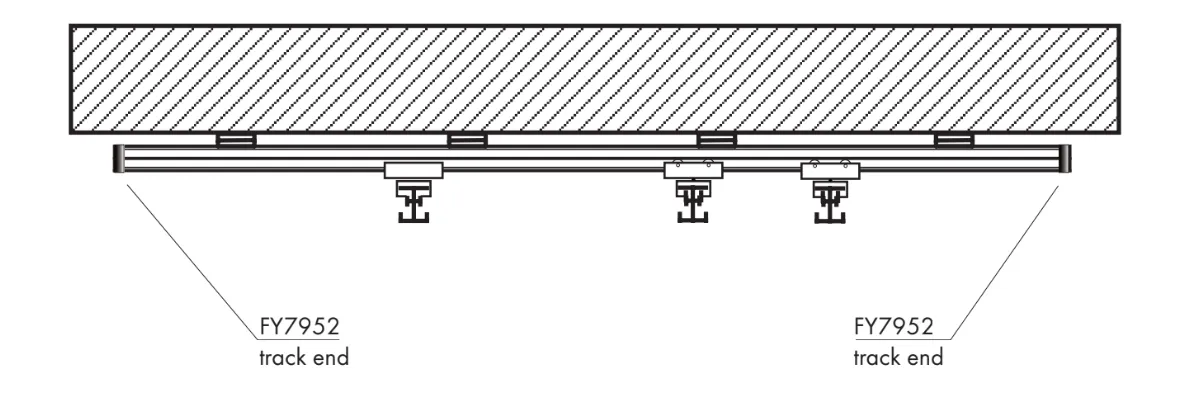
- Připevněte konce kolejí /FY7952/ na obou stranách pohyblivých kolejí.
- Připevněte pantograf /FY7933/ na jediný vozík /FY7935/.
- Nainstalujte kabel, který upevňuje /FY7939/ na římsy, které jsou na pantografu.
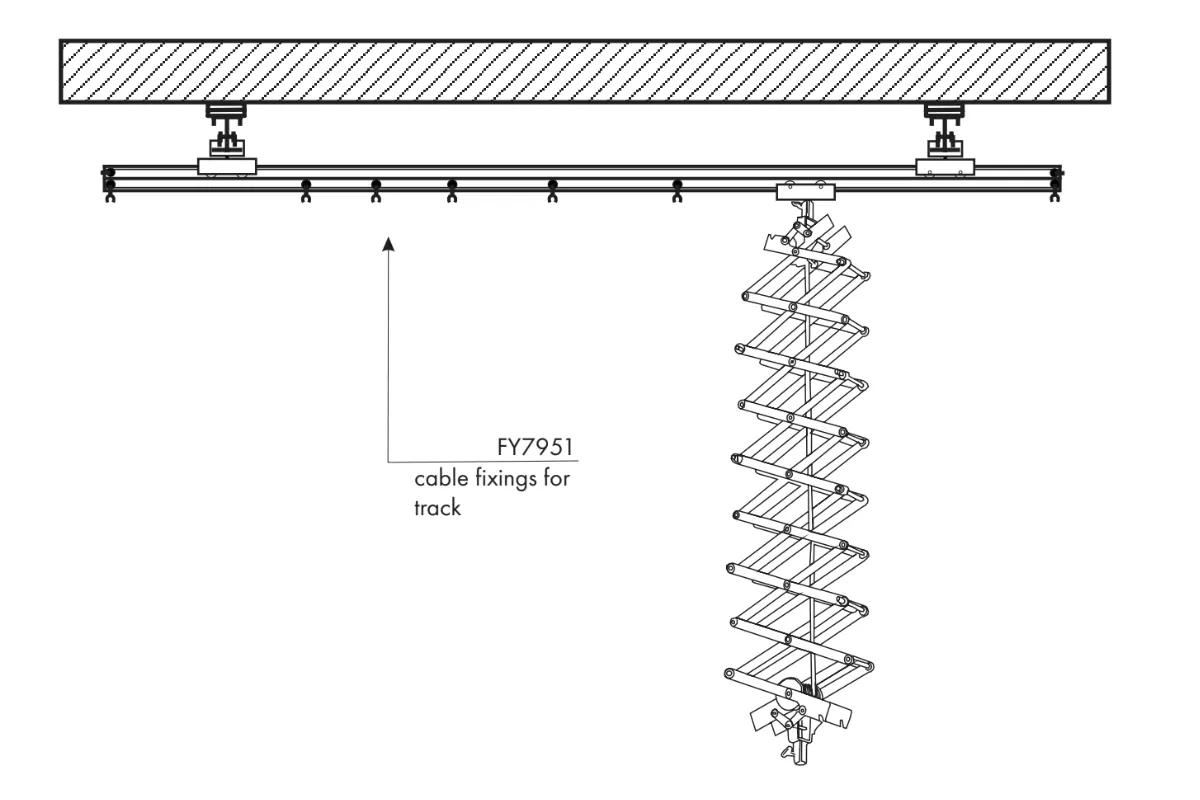
- Kabelové upevnění rovnoměrně rozložte po kolejích.
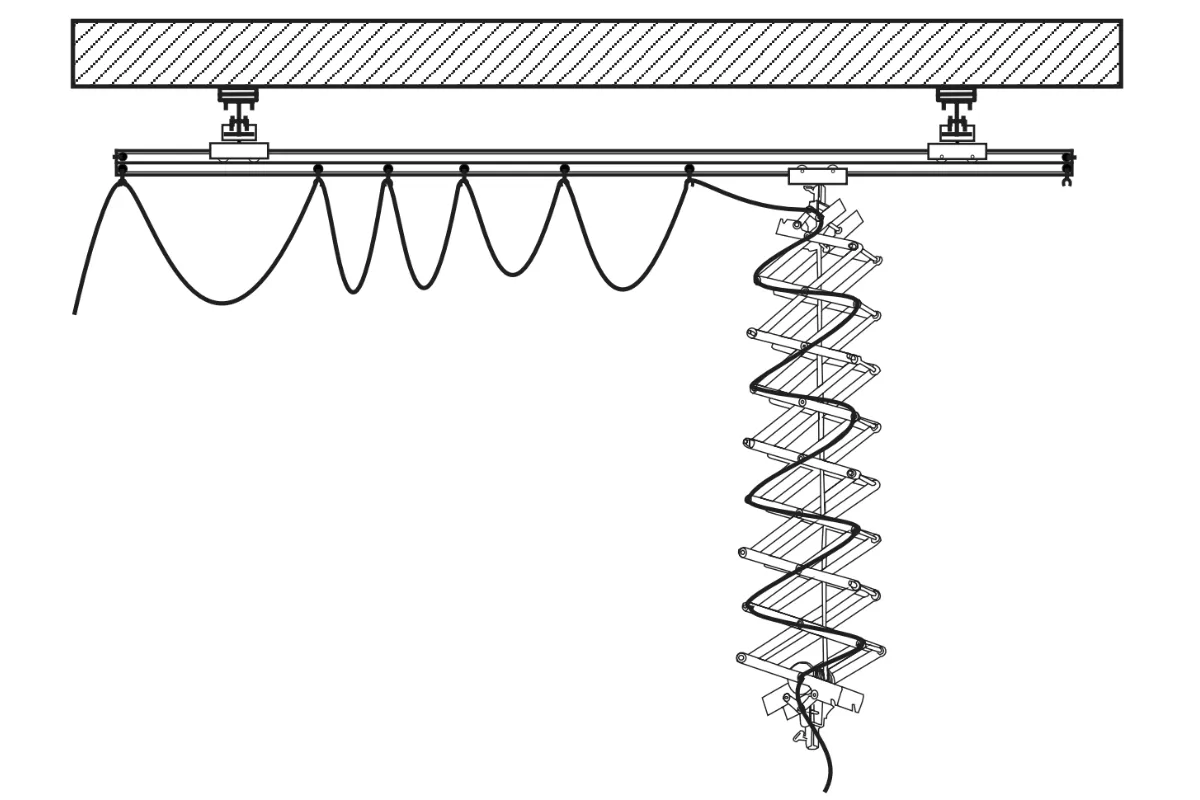
- Nainstalujte kabel do kolejí a pantografů, aby se pantograf mohl pohybovat s kabelem po celé koleji.
Stropní systém: Sada 2 (3 x 5m)
Stropní světelný systém FOMEI Kit 2 (3 x 5 metrů) vyžaduje následující komponenty a postupy instalace.
- 3x track 3m
- 2x kolej 5m
- Stropní svítidlo s 8x kolejí
- 6x dvojitý tramvaj
- 3x pantograf
- 2x teleskopická tyč
- 5x jednokolejový vozík
- 70x oprava pantografu
- 10x konec kolejí - 1 pár
- 5x redukce se šroubem
- 5x bezpečnostní kabel
- 5x kabel 10m
- 15x lanový vozík
- FY7936 - dvojitá tramvaj
- FY7935 - jednokolejová tramvaj
- FY7951 - oprava kabelu na kolej
- FY7931 - kolej 3 m
- FY7938 - montáž kolejí až ke stropu
- FY7939 - kabelové svítidlo k pantografu
- FY7942 - redukce
- FY7943 - bezpečnostní kabel
- FY7945 - AC vstupní kabel 10m
- FY7952 - konec koleje
- FY7933 - pantograf
- příčník od 395mm do 2030mm
- maximální zatížení 1-15kg
- možnost regulace zablokování smyku
- bezpečnostní pojistka
- FY7934 - teleskopická tyč
- 3 sekce
- příčník od 875mm do 1920mm
- pružina pro zjednodušenou manipulaci
- bezpečnostní pojistka
- Hlavní ložiskové pásy by měly být od sebe vzdáleny alespoň 180 cm. Tím zajistíte správnou funkčnost pohyblivých kol.
- Všimněte si, že vzhledem k minimálnímu valivému odporu je nutné vyvážit hlavní pásy.

- Ujistěte se, že hlavní koleje jsou připevněny maximálně 50 cm od okraje.
Nejvhodnější a ověřený postup instalace kolejí je následující.
- Nainstalujte dvojité vozíky, otočené přibližně o 80 stupňů, na jednu z kolejí připevněných ke stropu.
- Nainstalujte dvojitý vozík na pohyblivou kolej.
- Posuňte pohyblivou kolejnici do dvojité tramvaje, která je instalována na připevněné kolejnici.
- Nainstalujte pohyblivou kolejnici s vozíkem do připevněné kolejnice.
- Nyní jsou dvojité tramvaje instalovány na připevněných kolejích a pohyblivá kolej je instalována do dvojitých tramvají.
- Pokračujte stejně tak v dalších skladbách.
- Nainstalujte jednotlivé vozíky /FY7935/ do koleje.
- Nainstalujte vozíky s kabelovým upevněním na kolejích /FY7951/.
- Připevněte konce kolejí /FY7952/ na obou stranách pohyblivých kolejí.
- Připevněte pantograf /FY7933/ na jediný vozík /FY7935/.
- Nainstalujte kabel, který upevňuje /FY7939/ na římsy, které jsou na pantografu.
- Kabelové upevnění rovnoměrně rozložte po kolejích.
- Nainstalujte kabel do kolejí a pantografů, aby se pantograf mohl pohybovat s kabelem po celé koleji.
Stropní systém: Sada 3 (5 x 5m)
Stropní světelný systém FOMEI Kit 3 (5 x 5 metrů) vyžaduje následující komponenty a postupy instalace.
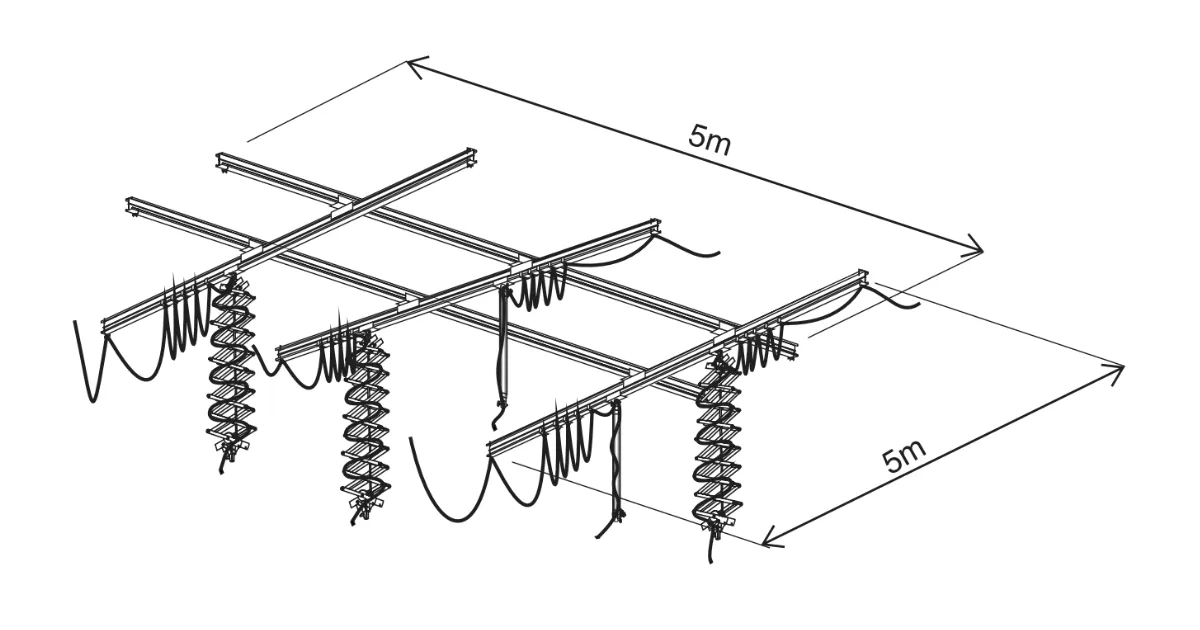
- 5x kolej 5m
- Stropní svítidlo s 8x kolejí
- 6x dvojitý tramvaj
- 3x pantograf
- 2x teleskopická tyč
- 5x jednokolejový vozík
- 70x oprava pantografu
- 10x konec kolejí - 1 pár
- 5x redukce se šroubem
- 5x bezpečnostní kabel
- 5x kabel 10m
- 15x lanový vozík
- FY7936 - dvojitá tramvaj
- FY7935 - jednokolejová tramvaj
- FY7951 - oprava kabelu na kolej
- FY7931 - kolej 3 m
- FY7938 - montáž kolejí až ke stropu
- FY7939 - kabelové svítidlo k pantografu
- FY7942 - redukce
- FY7943 - bezpečnostní kabel
- FY7945 - AC vstupní kabel 10m
- FY7952 - konec koleje
- FY7933 - pantograf
- příčník od 395mm do 2030mm
- maximální zatížení 1-15kg
- možnost regulace zablokování smyku
- bezpečnostní pojistka
- FY7934 - teleskopická tyč
- 3 sekce
- příčník od 875mm do 1920mm
- pružina pro zjednodušenou manipulaci
- bezpečnostní pojistka
- Hlavní ložiskové pásy by měly být od sebe vzdáleny alespoň 180 cm. Tím zajistíte správnou funkčnost pohyblivých kol.
- Všimněte si, že vzhledem k minimálnímu valivému odporu je nutné vyvážit hlavní pásy.
- Ujistěte se, že hlavní koleje jsou připevněny maximálně 50 cm od okraje.
Nejvhodnější a ověřený postup instalace kolejí je následující.
- Nainstalujte dvojité vozíky, otočené přibližně o 80 stupňů, na jednu z kolejí připevněných ke stropu.
- Nainstalujte dvojitý vozík na pohyblivou kolej.
- Posuňte pohyblivou kolejnici do dvojité tramvaje, která je instalována na připevněné kolejnici.
- Nainstalujte pohyblivou kolejnici s vozíkem do připevněné kolejnice.
- Nyní jsou dvojité tramvaje instalovány na připevněných kolejích a pohyblivá kolej je instalována do dvojitých tramvají.
- Pokračujte stejně tak v dalších skladbách.
- Nainstalujte jednotlivé vozíky /FY7935/ do koleje.
- Nainstalujte vozíky s kabelovým upevněním na kolejích /FY7951/.
- Připevněte konce kolejí /FY7952/ na obou stranách pohyblivých kolejí.
- Připevněte pantograf /FY7933/ na jediný vozík /FY7935/.
- Nainstalujte kabel, který upevňuje /FY7939/ na římsy, které jsou na pantografu.
- Kabelové upevnění rovnoměrně rozložte po kolejích.
- Nainstalujte kabel do kolejí a pantografů, aby se pantograf mohl pohybovat s kabelem po celé koleji.
Závěrečné poznámky
Pro oficiální dokumentaci od výrobce a informace o záruce pro vaše konkrétní FOMEI zařízení navštivte oficiální webové stránky FOMEI na fomei.com.


Řada EOS Rebel


Řada EOS DSLR


Řada bezzrcadlových fotoaparátů EOS M


Řada PowerShot


Zblízka / Z ruky

Řada Canon EOS Rebel nabízí digitální zrcadlovky vhodné pro začátečníky se solidní kvalitou obrazu, intuitivním ovládáním a všestrannými funkcemi. Tyto fotoaparáty jsou ideální pro nadšence do fotografování a poskytují spolehlivé automatické ostření, otočné dotykové obrazovky a nahrávání videa v rozlišení Full HD nebo 4K.
Připojení
Rozlišení (MP)
Usnesení
Digitální zrcadlovky Canon EOS poskytují vysoce kvalitní snímky, rychlé automatické ostření a všestrannost, takže jsou ideální pro fotografování i produkci videa.
Připojení
Rozlišení (MP)
Usnesení
Bezzrcadlové fotoaparáty Canon řady EOS M kombinují kompaktní design s výkonem podobným digitální zrcadlovce. Tyto fotoaparáty jsou vybaveny vyměnitelnými objektivy, rychlým automatickým ostřením a vysoce kvalitními obrazovými snímači a jsou skvělé pro cestovatele a tvůrce obsahu, kteří hledají přenositelnost bez obětování kvality obrazu.
Připojení
Rozlišení (MP)
Usnesení
Řada Canon PowerShot nabízí kompaktní, uživatelsky přívětivé fotoaparáty pro příležitostné fotografy a nadšence. Modely od jednoduchých kompaktních kamer až po pokročilé kamery se zoomem poskytují pohodlí, solidní kvalitu obrazu a funkce, jako je stabilizace obrazu a 4K video.
Připojení
Rozlišení (MP)
Usnesení
Kamery Canon pro detailní fotografování a ruční fotoaparáty jsou určeny pro detailní fotografování a natáčení videa zblízka. Jsou kompaktní a snadno použitelné, nabízejí přesné ostření, zpracování obrazu ve vysokém rozlišení a všestranné makro funkce – ideální pro vlogování, produktovou fotografii a kreativní záběry zblízka.
Připojení
Rozlišení (MP)
Usnesení


